Change the playstation laser lensHo alcune playstation (tutte primo modello, quello ciccio distribuito prima dell'avvento di psone) e una delle ultime che mi sono procurato è propio il primo primo modello uscito, quello con anche gli RCA sulla piastra madre, una chicca per gli audiofili ;).
Dunque, questa ultima play me la sono procurata davvero a poco, praticamente regalata...ma aveva la lente che non andava, allora visto che era un peccato buttare via un tale pezzo hardware ho pensato di sistemarla provando a sostituire l'ottica con un'altra proveniente da un'altra plyastation uguale che però aveva problemi di board....alla fine da due playstation ne ho ricavata una :)
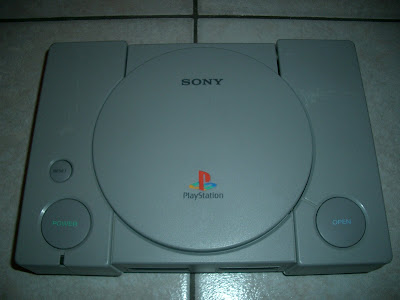
Il modello in questione è il pregiato SCPH-1002, quello del dayone della playstation per intenderci, che ha un hardware un pò diverso e più raffinato delle ultime prodotte e con rca posti sul retro della console (assenti nelle versioni successive).
Ha la lente orientata diversamente rispetto ai modelli successivi, ma la lente, a parte la lunghezza dei cavi e di un piccolo supporto non differisce di molto, quindi, con i dovuti accorgimenti, questa piccola guida per la sostituzione della lente andrà benissimo anche per i modelli più recenti di playstation (la versione cicciona però, non per la psone).
I have some playstation (all first model, not PSONE) and the last I've got is the "day one" model, that even with the RCA on the motherboard, a treat for audiophiles ;).
That last play I've got has some lens problem, then saw it was a shame to throw away a piece of hardware like that.....so i've decided to try to fix by trying to replace the lens with another from another playstation like this but with some problem at the motherboards....so, at the end, i mixed two playstation :D
This model is the valuable SCPH-1002, that of the playstation "Day one" to understand, that has the rca connector on the back of the console (absent in later versions).
Its Has the lens oriented differently than the later models, but the lens, apart from the length of cables and a small support is no much different, so with the necessary precautions, this guide to replace the lens will be fine for most models of playstation (the fat, however, not the PSone).Gli oggetti per questa piccola riparazione sono davvero pochi:
Objects for this small repairs are very few:- Lente di ricambio
(lens replacement)- cacciavite a stella
(screwdriver)- Nastro adesivo
(tape)Ho fotografato, passo per passo, tutto il lavoro, cosi se qualcuno vuol sostituire la lente della sua playstation può farlo in due minuti senza problemi ;).
I have photographed, step by step, all the work, so if anyone wants to replace the lens of your playstation can do it in two minutes without any problems).PASSO 1
Rimuovere lo sportellino della porta parallela.
Remove the cover parallel port.
PASSO 2
Operando sul lato inferiore della console, svitare e togliere le 5 viti indicate in figura.
Working from the underside of the console, unscrew and remove the five screws shown in the picture.
PASSO 3
Rimuovere il guscio superiore della Playstation.
Remove the upper shell of the Playstaion.
PASSO 4
Facendo attenzione a non rovinare i connettori o i cavi stessi, sfilare i due cavi indicati in figura dalla motherboard della playstation.
Una volta scollegati i cavi, è possibile sfilare la lente laser (è attaccata alla piastra solo tramite i tre attacchi in gomma antivibranti e si sfila molto bene dai piolini di fissaggio).
Taking care not to damage the cables or connectors, remove the two cables from the motherboard shown in the picture.
Once disconnected the cables, you can remove the laser lens (it is attached to the plate only by three anti-vibration rubber and takes off very well by fixing pins).
PASSO 5
Prendere la lente di ricambio dello stesso tipo.
Take the new lens of the same type.
PASSO 6
Posizionare con delicatezza, per non rovinare i tre gommini antivibranti, la nuova lente come mostrato in figura e collegare i due connettori indicati con cura.
Put gently, not to ruin the three vibration dampers, the new lens as shown and connect the two connectors marked with care.
PASSO 7
Posizionare il cavo come in figura e fermarlo con un pezzetto di nastro adesivo.
Place the cable as shown and secure with a piece of tape.

PASSO 8
Riposizionare il guscio superiore.
Replace the upper shell.PASSO 9
Ruotare la console e sulla base inferiore avvitare le cinque viti indicate in figura.
Working on the bottom of the console, tighten the five screws shown in the picture.
PASSO 10
Riposizionare lo sportellino della porta parallela.
Replace the cover parallel port.PASSO 11
Il gioco è fatto, la Play è di nuovo operativa ed è come nuova ;).
The game is done, the Playstation is operational again and is like new ;).

 ;)
;)